Tag: Nginx

  • Serverless Data Processing Under Constraints

    Serverless Data Processing Under Constraints

    The Challenge: Serverless Data Processing

    Imagine having to extract and process a large amount of data using as few resources as possible. It sounds like a great challenge, almost paradoxical, yet it was one of the most stimulating problems I have faced and one that I would like to talk about in this article.

    The context was a microservice developed in Go and deployed via IaC on an AWS-based Serverless architecture. The stack leveraged several services, but I will focus on two: Lambda Functions and the NoSQL database DynamoDB.

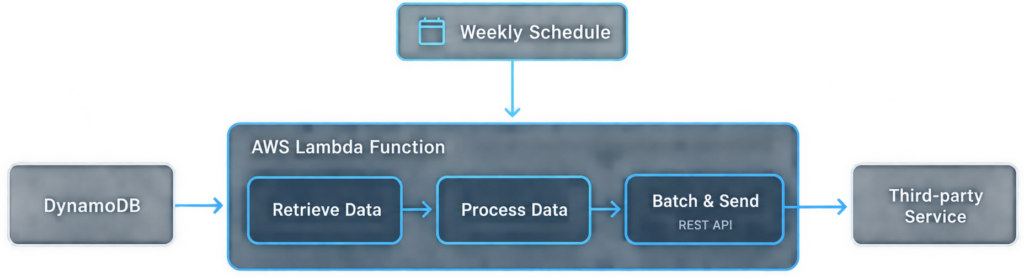
    In short, the goal was to extract raw data from this database, process it, and finally send it to a third-party service via API calls. All these operations had to be executed periodically and automatically.

    Constraint Analysis

    I started by analyzing the problem to plan the actions to take during implementation and in the subsequent testing phases.

    The first constraint identified, intrinsic to the project, was exactly the architecture already adopted within the cloud infrastructure. The new feature therefore had to be defined within this pre-established boundary, leaving the identification of the most suitable AWS service as the main area of choice.

    I decided to use Lambda. Running a process that could last, at least theoretically, in the order of minutes, but had a weekly schedule, made it clear how a pay-per-use model could be more convenient compared to other solutions with fixed costs and pre-allocated resources. In the latter case, in fact, the periods of inactivity would have been very long and would have led to a waste of resources.

    The second constraint was instead a direct consequence of the first choice: the optimized use of computational resources, such as CPU and memory, while respecting the maximum timeout imposed for Lambda Functions.

    In addition, on the database side, there was also the need to keep DynamoDB read capacity consumption under control.

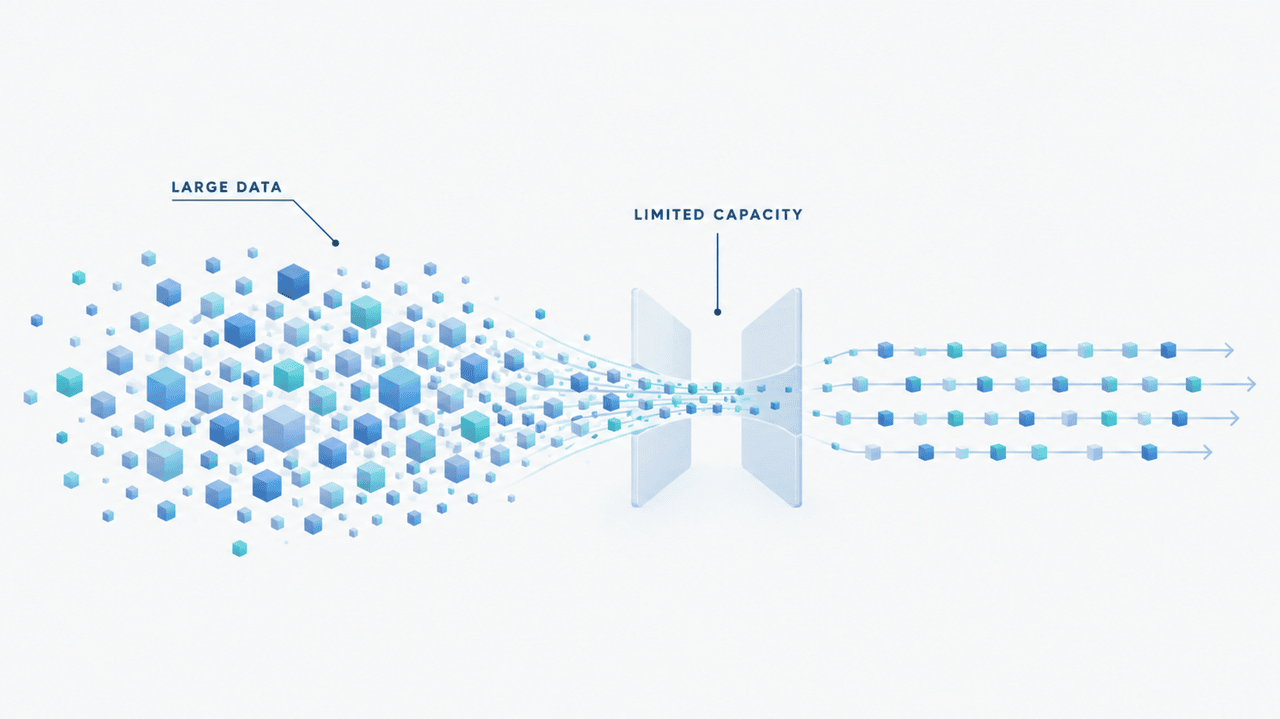
    This led to the need to design a concurrent processing strategy that allowed data to be processed efficiently, without compromising the execution time of the function.

    I therefore focused on using the Worker Pool pattern in Go and on concurrent retrieval, together with an optimized data extraction from DynamoDB.

    The last constraint, on the other hand, concerned sending the large amount of processed data to the third-party service, which had to respect a specific format and, above all, a payload limit, also taking latency into account.

    The decision to split the data into batches to be sent with each request was therefore the most direct and effective solution.

    Workflow Planning

    Once this first phase of analysis was completed, I moved on to planning the actual workflow, from implementation down to final testing. I divided the development into three main sections: retrieving data from DynamoDB, processing it, and finally sending it via RESTful APIs.

    The approach was incremental, progressively testing the implemented features with a small amount of test data in a dedicated development environment. The initial focus was on the correctness of the implementation and on data consistency.

    Once this first phase was finished, the next step involved using large volumes of real data, but still in a non-production environment. The goal was to verify that all the analyzed constraints were respected, evaluating performance through metrics collected from dedicated logs added to the code.
    Infrastructure Configuration

    On an operational level, the initial step was configuring the Lambda Function via IaC, defining the necessary parameters. The most relevant ones were memorySize and timeout.

    The first was particularly important because, besides determining the memory allocated to the function, it also influenced the amount of CPU available to it. The second one, instead, could not exceed 900 seconds (15 minutes).

    Initially, I set these two parameters with indicative and relatively low values, so I could proceed with the implementation. Once I moved to the final testing phase on real data, the approach was to tune these values, along with other parameters used in the codebase that I will describe later.

    Two other fundamental elements of the infrastructure were also involved: the IAM role associated with the Lambda and EventBridge.

    The IAM role was necessary to define the function’s permissions, from accessing the DynamoDB tables down to writing logs to CloudWatch.

    I used EventBridge to schedule the Lambda and automatically start the process according to the expected schedule.

    Concurrency in Go: The Worker Pool Pattern

    Now let’s get into the heart of the matter, which is how I handled concurrency for data extraction and processing. The pattern I used was the Worker Pool.

    I deliberately excluded the sending phase from this strategy, preferring to execute it afterwards, once the data extraction and processing were completed. This way I could properly prepare and validate everything before proceeding with sending it to the external service.

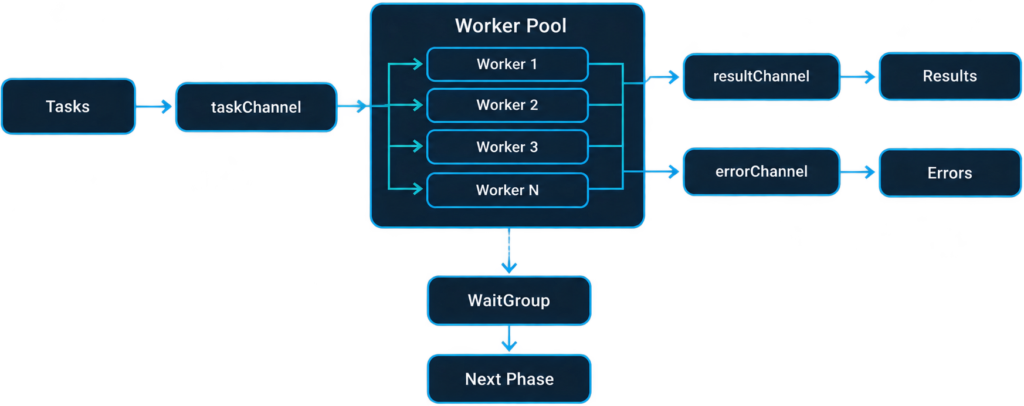
    Go provides so-called goroutines, very lightweight execution units managed by the runtime and suitable for the concurrent execution of multiple tasks. Each worker was implemented through a goroutine. By leveraging Channels and WaitGroups, I could distribute the tasks among a controlled number of workers and synchronize their completion.

    The problem was that it didn’t make sense to spawn an indefinite number of workers, but I had to set a fixed number, so that there were enough to handle the large amount of data, but not so many as to saturate all available resources. This was therefore another parameter to be tuned in the final testing steps.

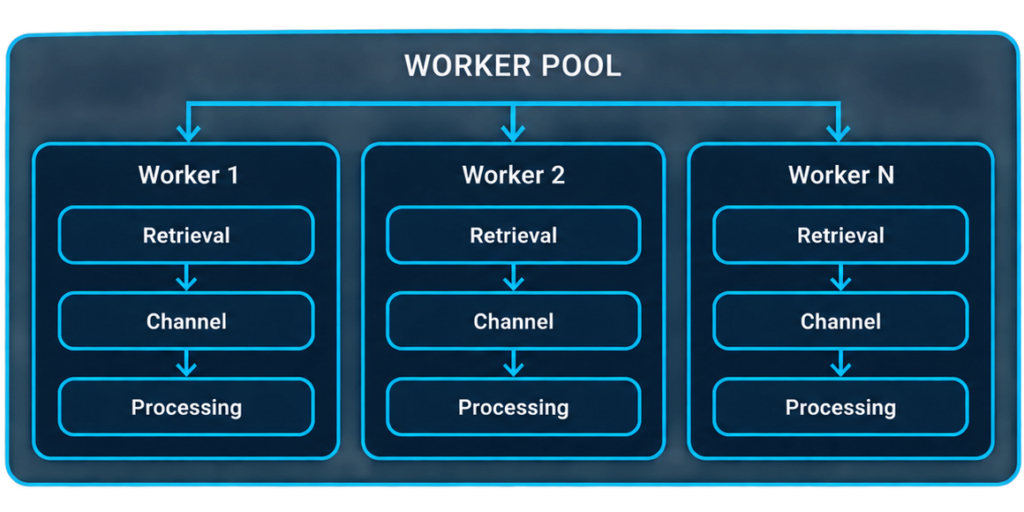
    To structure this management, I essentially used three Channels. The first, called taskChannel, allowed the workers to pick up tasks, while the processing result was put into the resultChannel. All this with the addition of an errorChannel, used to handle any errors during processing. The WaitGroup allowed me instead to wait for the completion of all workers before proceeding to the next phase.
    With this approach based on the Worker Pool, the target was clear: reducing the total execution time of the Lambda. However, to keep the memory usage of the Lambda itself contained, another crucial focus became efficient data extraction. This need was combined with the other important goal: containing DynamoDB’s read capacity consumption, which represented a further constraint to take into consideration.

    DynamoDB Optimization

    Now comes the other central aspect, namely DynamoDB. Here I first had to identify the most suitable access pattern, keeping in mind the constraints on resources.

    As anticipated, one of the fundamental elements to consider was the consumption of Read Capacity Units (RCUs).

    The choice of the access pattern therefore had to take into account this constraint, but also the structure of the data I had available. For example, if I had to retrieve “primary” data without having an access pattern that allowed targeted access, the solution, although not ideal, was the Scan.

    If instead I had to retrieve “derived” data from previously obtained information and the table architecture allowed it, I could use a Query, identifying the items through the PartitionKey value and possibly further restricting the result through a condition on the SortKey. In this last case, any GSI/LSI indexes could also be used to access the data through a different access pattern.
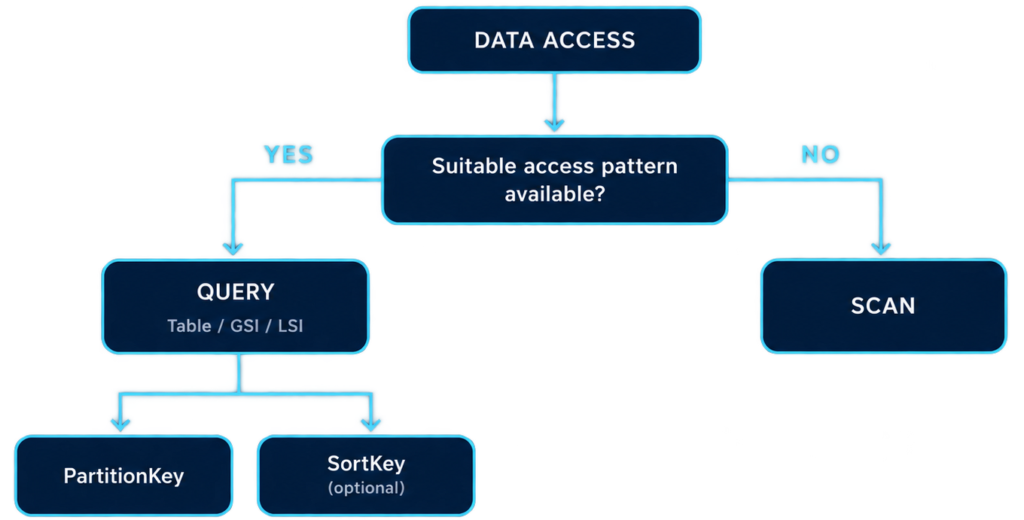
    Another aspect to consider concerned what data I specifically needed. This was linked to the other goal, namely minimizing the Lambda’s memory consumption. It was therefore necessary to avoid retrieving all the item attributes, focusing only on those that would actually be used in the processing inside the workers.

    And this is where ProjectionExpression came into play, which allowed me to specify which attributes to retrieve from DynamoDB. I would like to explicitly point out that this did not reduce the consumed RCUs: the advantage mainly concerned the amount of data transferred and kept in memory by the Lambda.

    One last aspect remained to be addressed. DynamoDB imposes a limit of 1 MB of evaluated data per single Scan or Query operation, making pagination necessary when the evaluated data exceeds this limit. This is where LastEvaluatedKey solved the issue.

    Retrieval Parallelization and Pipeline

    At this point I considered a couple of additional strategies to improve data retrieval, linking them also to the Worker Pool topic.

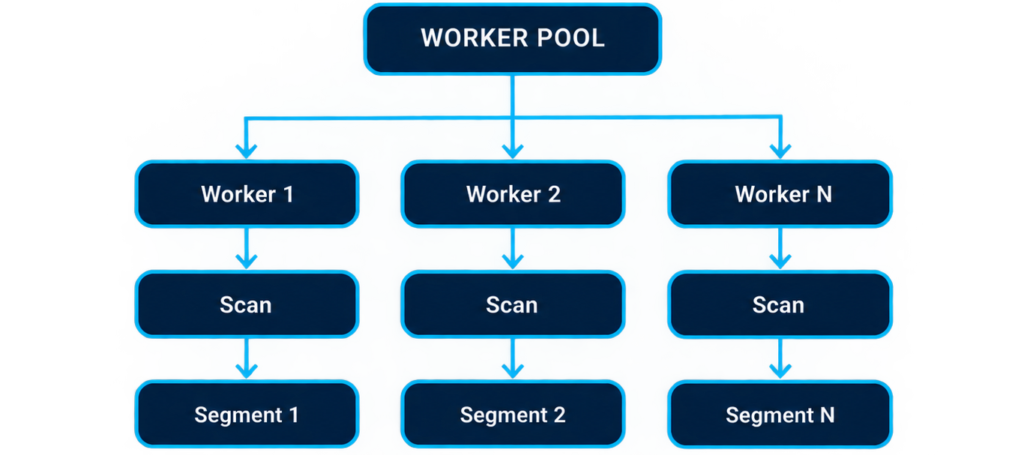
    The first concerned the Scan case. The idea was to reduce the Lambda’s execution time by splitting the Scan into many segments, assigning each one to a worker. This way, each goroutine executed the Scan for that specific segment. This choice, while potentially reducing execution time significantly, would however have increased the parallelism of read operations and therefore the peak RCU consumption, increasing the risk of throttling.
    The second strategy, which proved to be the winning one, instead concerned the use of a separate Channel that was progressively populated with the extracted data. The retrieval function received this channel as a parameter and wrote to it as data became available. This way I created a sort of continuous stream through the channel, avoiding having to wait for the completion of the entire extraction by the database before starting to process the results. This decoupling therefore allowed the extraction and processing to overlap, reducing the workers’ wait times. The downside of this approach was the potential accumulation: an extraction that was too fast compared to the workers could in fact have progressively increased memory consumption.
    Final Checks and Considerations

    Without dragging this out further, I would now like to briefly talk to you about the final post-implementation phase.

    I ran the tests in a specific pre-production environment using data volumes similar to the real ones. In this step I leveraged the logs I had inserted into the code, reviewing them in CloudWatch to verify the Lambda’s behavior and the consistency of the results.

    As the amount of data increased, it progressively became necessary to tune the parameters described earlier. Contrary to what I had initially expected, I had to adjust the number of workers only a few times.

    The main point of reference during this phase was the Lambda execution time, since, from an operational point of view, it was the most critical metric: exceeding the maximum timeout would have in fact rendered the entire feature unusable.

    Surprisingly, this value turned out to be very low, on the order of a few minutes for the entire cycle across the three steps.

    Memory and RCUs had been considered in the design and in the previous implementation choices, but in the final phase they did not require any significant further optimization.

    Errors encountered during the three stages were tracked in the logs without interrupting the execution of the process, allowing me to later verify in CloudWatch which data had been processed correctly and which had shown anomalies.

    The architecture also left some room to handle larger volumes by increasing the number of workers and, if necessary, the memory allocated for the Lambda.

    The subsequent checks with real data finally confirmed that the solution was working as expected.

    Last Thoughts

    For me it was a really interesting experience, which allowed me to dive into and evaluate in detail all these aspects we discussed in this article.

    It was also an opportunity to practically confront the dynamics of a serverless cloud architecture, where the different characteristics of the services used directly influence the design choices and the way a solution must be implemented.

    In the end, it’s all a game of balance and trade-offs between constraints, parameters, and resources.

    Thanks for reading.
  • Designing a Self-Hosted Blog Infrastructure

    Designing a Self-Hosted Blog Infrastructure

    This article describes the reasoning behind designing my self-hosted blog infrastructure.

    Introduction

    The idea of starting a personal blog is exciting. Making it happen, however, requires careful consideration of which technologies to use and how to set up the infrastructure. These decisions are rarely straightforward, as there are so many alternatives available today, and without a clear understanding of the priorities, choosing the right one becomes complicated.

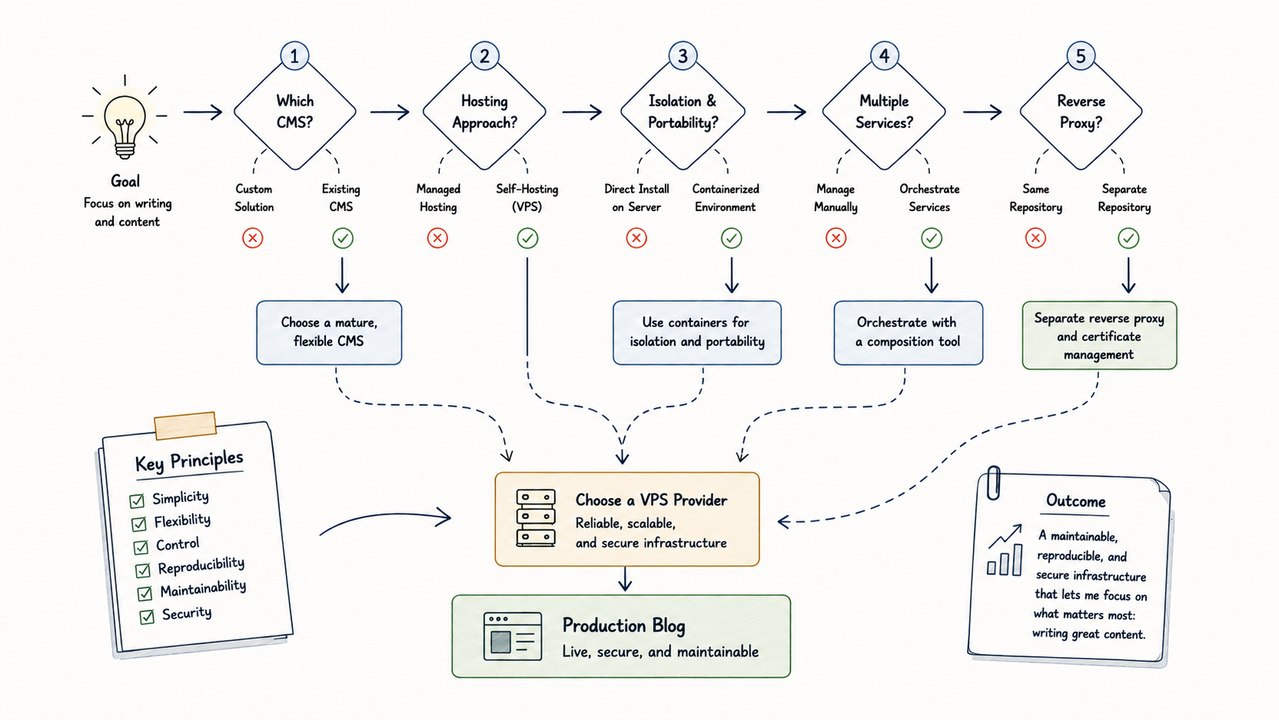
    My initial goal was to find a tool that, without requiring excessive technical effort, would allow me to focus directly on writing articles and effectively managing content.

    Choosing the Right CMS

    What better solution than using an existing Content Management System (CMS)? The other option I had, as a software engineer, would have been to design and implement a custom web platform. However, this would have been over-engineering, introducing significant technical overhead and, in a sense, reinventing the wheel to create a personal blog.

    Among the various options, I was drawn to Drupal, as I already had experience using it and, especially, customizing its components. Building a blog with Drupal was certainly possible, but it would have taken more time; furthermore, Drupal is a platform designed primarily for corporate websites and highly complex projects.

    Consequently, my final choice was WordPress: one of the best-known CMSs for building blogs. Its simplicity made it the ideal choice for my initial goal. If I ever wanted to expand the functionality of my personal space, I would always be free to explore other options by migrating, but as a starting solution, WordPress was excellent.

    From Managed Hosting to Self-Hosting

    The next step was choosing a hosting method. The hosting landscape, of course, is a world of its own, as, in addition to using WordPress, there were many options I needed to consider: from Managed Web Hosting to Self-Hosting on a VPS.

    Here, I encountered my first deviation from the initial goal of having the least possible technical overhead. Indeed, having control of the infrastructure without limitations and the possibility of reusing and extending it for other projects in the future became an important goal. Complete control, however, came at the cost of taking full responsibility for managing the system.

    I had decided on self-hosting, but I preferred to wait before choosing a VPS provider, as I first wanted to decide how to install and configure the WordPress environment and, finally, understand and estimate hardware resource usage.

    Why I Chose Docker

    The most straightforward approach would have been to install all the CMS components directly on the host that would eventually become the VPS. Direct installation, however, had significant implications. First, it would create a tight coupling between the software and the host environment, with a strong dependency on the operating system and its configurations. Such coupling would have made it difficult to reproduce the WordPress stack on another host in the future, requiring everything to be configured again.

    Security was another critical aspect: a compromise of the CMS would also directly affect the hosting environment, potentially requiring the entire VPS operating system to be reinstalled.

    Additionally, I wanted maximum flexibility and portability for my applications on the host server, as the projects to be hosted were not limited to just the WordPress blog.

    Last but not least, the entire infrastructure could be version-controlled alongside the project, making every configuration change traceable and reproducible.

    All these reasons were decisive in choosing one of the most well-known containerization systems: Docker.

    Deploying the applications in an isolated, reproducible, portable, and version-controlled environment was truly a great solution.

    Building the Docker Compose Stack

    Moreover, using Docker Compose, I built a set of coordinated containers so that the various CMS components could talk to each other. The simple yet effective idea was: one service = one responsibility.

    From this point on, the approach was incremental but above all exploratory. In addition to the basic services required for WordPress to function, the idea was also to add others, such as utility services, to automate certain processes, including database initialization, synchronization, and backups.

    Automation was also made possible thanks to the use of shell scripts executed within the various containers.

    I performed the implementation and testing on my local computer, where I had installed Docker Desktop. The strategy was to split the Docker Compose configuration into three files. The first would contain the base configuration. The second would add everything needed for local development. Finally, the third file would include the production-specific configuration for the VPS.

    I opted for these environment overrides because the production environment is much more demanding, requiring resource management, logging, and specific configurations for the various services and their interactions.

    An optional but very useful tool was a Makefile. Instead of typing out all the Docker Compose commands each time, I simply mapped the various targets with their specific commands in a separate file. The Makefile allowed me to automate multiple operations both on my local computer and on the host.

    Adding Continuous Integration was another optional step to perform a basic validation with each push or pull request. The checks were intentionally minimal and included linting the Docker Compose files, POSIX shell scripts, the Makefile, and Markdown files.

    Separating the Reverse Proxy

    At a certain point, I realized that, from an architectural perspective, it would be better to create another repository alongside this one, extracting all the Nginx reverse proxy logic and certificate management. The separation added complexity, but from an extensibility and modularity perspective, it was a sound choice. Indeed, if I wanted to install another web application on my server in the future, it would have been enough to reuse the same repository as the single entry point capable of routing requests to the specific application while centrally managing SSL/TLS certificates.

    Choosing the VPS Provider

    The final step was to decide on a domain name and, more importantly, a VPS provider. After some research, I concluded that OVHcloud met both my needs. What immediately stood out to me was the availability of more resources at the same price. Furthermore, the provider enjoyed a good reputation among users, making the decision straightforward.

    After purchasing, I applied the basic security configurations by following the excellent documentation provided. I also really appreciated the VPS’s daily backup feature: in case of errors or specific needs, it allowed me to quickly and easily restore a previous state.

    Final Thoughts

    In conclusion, this whole process was a great experiment for me. I admit that initially I wanted to save technical time on the CMS side, but then, ironically, I spent much more time on the DevOps side, giving in to over-engineering. There are certainly existing solutions on GitHub that could have reduced the amount of work involved.

    That said, I invite you to take a look at my two repositories for this project, covering the Nginx reverse proxy and the WordPress stack, respectively.

    Thanks for reading.

  • Running TwinCAT ADS Communication in Docker with TcpRouter

    Running TwinCAT ADS Communication in Docker with TcpRouter

    TwinCAT ADS Docker integration introduced some unexpected challenges during the containerization of a .NET application.

    The Initial Setup: TwinCAT ADS Communication Outside Docker

    One of the interesting projects I had the opportunity to contribute to was the integration with Beckhoff PLCs in the context of a .NET application.

    By using the TwinCAT libraries and, in particular, the TwinCAT ADS communication protocol, I was able to interface with and connect to the final machine.

    I carried out the implementation and subsequent tests directly on my local PC, with the TwinCAT ADS components installed. Finally, after configuring the Static Routes, I connected to the target, on which TwinCAT XAR was running with the related PLC project.

    Up to this point, I did not encounter any particular issues, since the ADS package on my PC included all the basic services strictly necessary for communication. I therefore only had to configure the routes once, in bidirectional mode, and everything was ready to go.

    The Challenge: Containerizing the Application

    At the end of the activity, the .NET application was functional and essentially completed. The only remaining step was containerization with Docker and the development of the Continuous Integration pipeline. This is where some issues began to arise, as the container had to be isolated and have a single responsibility, without TwinCAT installations or other third-party elements inside it.

    Evaluating ADS TCP Router

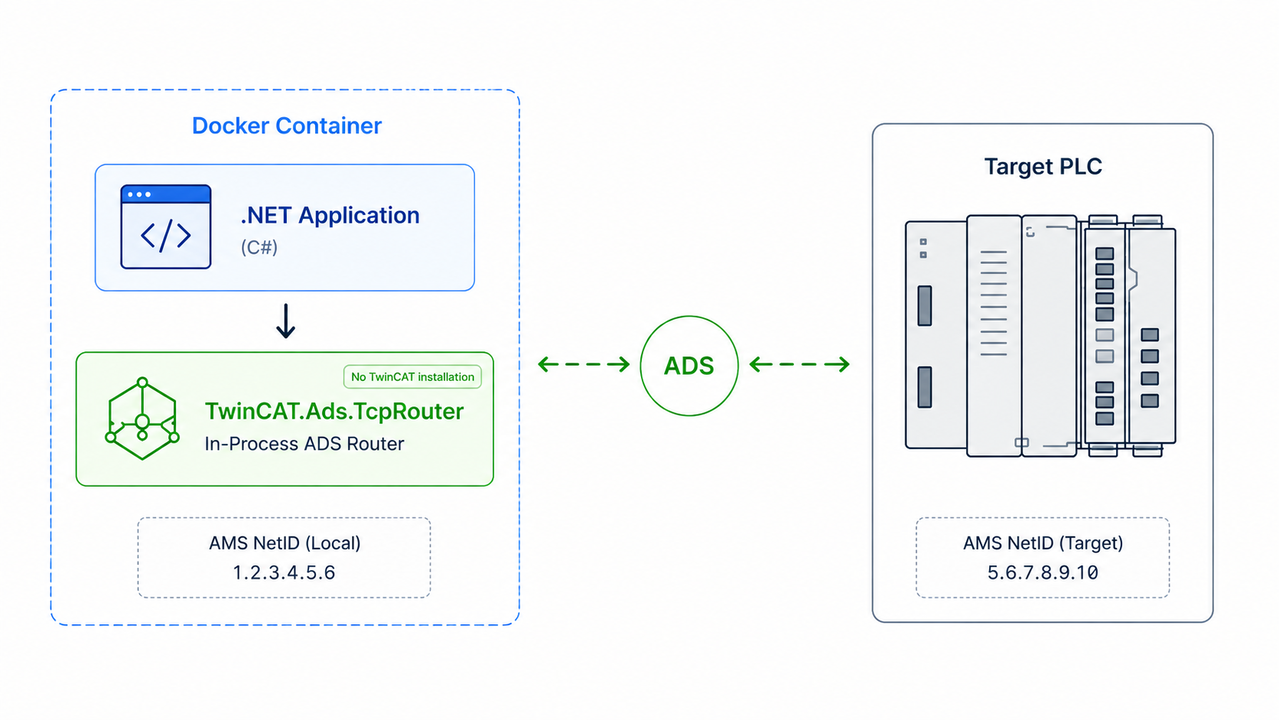
    After some research, my focus shifted directly to a possible solution which, from what I understood, seemed to solve exactly these types of cases. It is Beckhoff’s specific library: TwinCAT.Ads.TcpRouter.

    It is a direct and effective way to replace the installation of the local router as software with a lightweight in-process router within the codebase. The trade-off, as you can imagine, was integrating it into my implementation.

    I had not yet made the final decision, as I was still skeptical. I first wanted to carry out a Proof of Concept to validate this solution, observe how many modifications would be required, and above all determine whether I could connect to the target PLC from the container without the “router instance missing” error reported by TcAdsClient().

    Proof of Concept: Running ADS Communication Inside Docker

    The test was not as complicated as I had initially imagined. By configuring a local AMS NetID to be used within the container’s application context, the TcpRouter had to be started before the ADS connection so that it could be detected.

    The router started successfully and, after some attempts and reconfigurations, I was finally able to establish the connection with the target AMS NetID, all within the same local subnet.

    Once the feasibility had been demonstrated, I carried out the complete integration within the application.

    One of the subsequent checks was the complete deactivation of all active TcSysSrv services and their dependencies on my PC. In this way, I wanted to isolate my tests within the container without conflicts with the host components. The check was completed successfully.

    The Hidden Issue: Static Route Authorization

    A further test involved changing the static IP address of the host to a new one, without using the local router on my PC to perform the bidirectional authorization. The idea was to see what would happen if the TcpRouter inside the container handled everything for the first time.

    The router started correctly, but the connection to the target remained unreachable. At first, I thought it was a matter of network isolation between the host and the container, but that was not the case. In fact, the container was running in bridge mode, and the IP addresses were consistent and correctly mapped with the AMS NetIDs.

    The issue was something else: TcpRouter creates a connection that requires an authorized response from the target. Therefore, since the destination machine had not defined in its Static Routes the AMS NetID used in the container, it rejected the connection. The solution was to access the target’s Static Routes and add the mapping between the source IP address (the host’s IP address, which the target sees because of NAT) and the AMS NetID used by TcpRouter.

    One piece of advice I would give is not to use the “Broadcast Search” option in the dialog for adding a new route, because it does not automatically update the table. I entered everything manually and only saw the changes after refreshing the route list in the underlying window. In my opinion, the user experience of managing Static Routes in TwinCAT could be improved.

    Closing Thoughts

    This experience was very positive for me. In the end, it was interesting to see the complete communication flow from the container to the destination, managing to configure everything in an isolated, reproducible, and automated way. Containerizing an application is an additional layer of complexity that can sometimes require more effort than expected.

    Official References

    The following official Beckhoff resources provide additional information about the technologies discussed in this article:

    Thank you for reading.